Skip to content
  • Home
  • Plugins
    • Product Gallery Slider for WooCommerce
    • Deposits for WooCommerce
  • Docs
  • Blog
  • Support
Account

Getting Started

9
  • Can I use my license on a test or development site?
  • Where Is My Purchase Code?
  • How to Install the PRO version?
  • How to update the PRO version?
  • Where can I cancel my subscription?
  • Migrate Your Codecanyon License to Codeixer
  • How can I get an invoice for my order?
  • How to remove VAT or Sales Tax from Paddle?
  • Enabling usage tracking

Product Gallery Slider

13
  • How To Fix WooCommerce Blurry Images?
  • How to use gallery slider with WPML?
  • High CLS issue in mobile devices
  • Add Additional Variation Images in WooCommerce?
  • How to enable a lightbox popup on clicking the large image?
  • How to Add Video into Product Gallery?
  • How to use the Product gallery slider with Elementor Page builder?
  • How to use product gallery slider with Divi Page builder?
  • How to center the video play icon?
  • What is the difference between classic and Default Variation behavior options?
  • YITH WooCommerce Color and Label Variations Conflict
  • Conflicts with other themes & plugins
  • Hooks: Actions and Filters

Bayna - Deposits for WooCommerce

14
  • Translate deposit plugin using Loco Translate
  • Switch to WooCommerce Classic Checkout & Cart
  • Custom amounts for deposit order
  • Future/due Payment for Deposit orders
  • Set up deposit payment reminders for customers
  • Cart or Checkout based deposit
  • Deposit Payment Plans for WooCommerce
  • Enable the Deposit/partial payment feature for the Product
  • Disable Payment Gateways on the Checkout page
  • Customize Email Templates for Deposit Orders
  • Deposit amount conflict with the “WooCommerce PayPal Payments” plugin
  • Nothing is being created in the Woocommerce > Deposit Payments!
  • Changelog
  • For Developers

Medixer – Medical WordPress Theme

11
  • Getting Started
  • Theme Setup
  • Install theme demo content
  • Theme options
  • Menu Setup
  • Add Team Member
  • Add Services & Portfolio
  • How to use Elementor Page Builder?
  • Speed optimization
  • Change the slug for custom post types?
  • Change Log

Wishlist for WooCommerce

5
  • Getting Started
  • Plugin Settings
  • Shortcodes
  • Overwrite Wishlist Template
  • For Developers
View Categories
  • Home
  • Docs
  • Bayna - Deposits for WooCommerce
  • Translate deposit plugin using Loco Translate

Translate deposit plugin using Loco Translate

This guide explains step-by-step how to translate Deposit plugin using the Loco Translate plugin. Loco Translate is a popular tool for creating and editing translation files for WordPress themes and plugins.

https://www.codeixer.com/wp-content/uploads/2025/01/CleanShot-2024-09-08-at-17.55.03.mp4

Step 1: Install and Activate Loco Translate #

  1. Log in to your WordPress admin dashboard.
  2. Navigate to Plugins > Add New.
  3. Search for “Loco Translate” in the search bar.
  4. Click Install Now and then Activate once the installation is complete.

Step 2: Access Loco Translate #

  1. After activation, go to Loco Translate in the WordPress admin menu on the left-hand side.
  2. You’ll see sections for translating plugins, themes, and WordPress core files.

Step 3: Select the Plugin to Translate #

  1. Click on Plugins under the Loco Translate menu.
  2. A list of all installed plugins will appear. Click on the Deposits for WooCommerce plugin

Step 4: Choose a Language #

  1. You’ll see a list of available languages on the plugin’s translation page.
    • If your desired language is listed, click on it.
    • If your language is not listed, click New Language to add it.
  2. Choose a language from the dropdown menu:
    • Choose a language: Select the desired language (e.g., Spanish, French, German).
    • Choose a location: Select Custom to prevent your translations from being overwritten during plugin updates.
  3. Click Start Translating to proceed.

Step 5: Start Translate deposit plugin Strings #
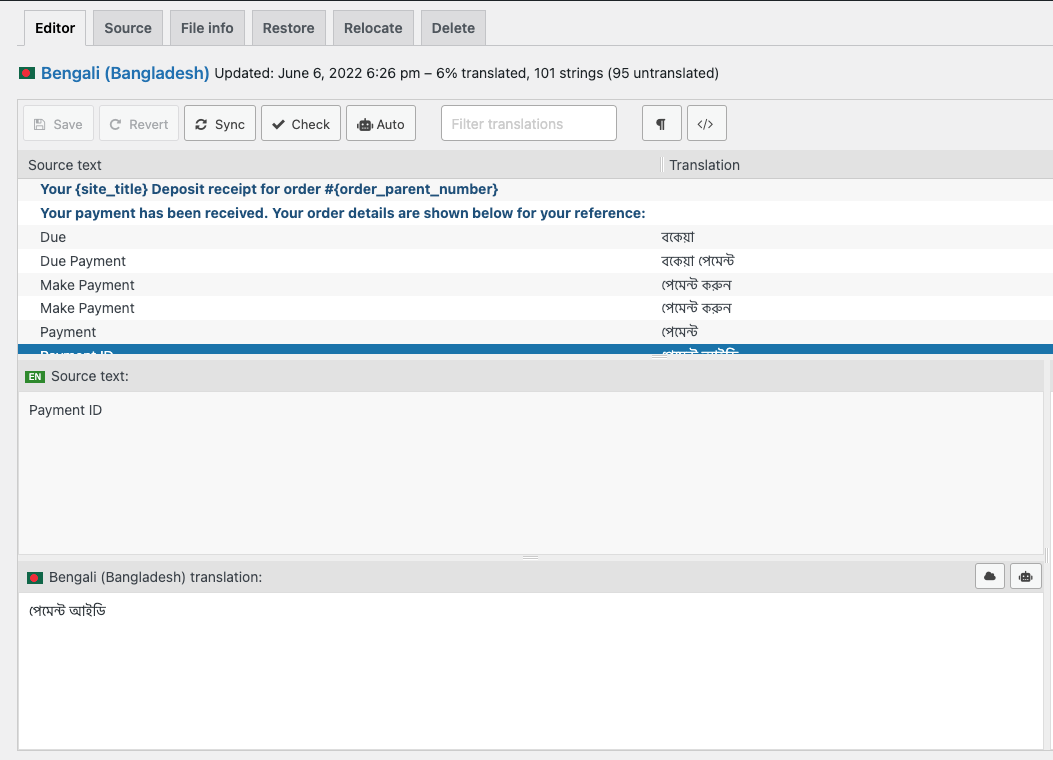
translate Deposit plugin
Translate deposit plugin
  1. A translation editor will open, showing a list of text strings from the plugin.
    • Source Text: The original text in the plugin’s default language.
    • Translation: The box where you enter the translated text.
  2. Click on a string from the list to select it.
  3. Enter the translated text for the selected string in the Translation box below.
  4. Repeat this process for all the strings you want to translate.

Step 6: Save Your Translation #

  1. Once you’ve finished translating, click the Save button at the top of the page.
  2. Loco Translate will save your translations to the specified location.

Test the Translations #

  1. Visit the frontend or backend area of your WordPress site where the plugin is used.
  2. Check if the translated text appears correctly.

Additional Tips #

  • Backup Your Translations: If you update the plugin, your translations might be overwritten if not saved in a custom location. Always back up your translations.
  • Sync Strings: If the plugin updates and new strings are added, return to Loco Translate, select the plugin, and click Sync to update the translation file with the latest strings.
  • MO and PO Files: Loco Translate automatically generates .mo and .po files for your translations. These files are essential for WordPress to recognize the translations.

Troubleshooting #

  • Translations Not Appearing: Ensure the desired language is set as the site’s language in Settings > General > Site Language.
  • Strings Missing: Sync the translation file to fetch any new or updated strings.

By following these steps, you’ll be able to translate any WordPress plugin effectively using Loco Translate. Let me know if you need any further assistance!

Updated on April 13, 2025
Bayna, Free, Pro

What are your Feelings

  • Happy
  • Normal
  • Sad
Share This Article :
  • Facebook
  • X
  • LinkedIn
  • Pinterest
Switch to WooCommerce Classic Checkout & Cart
ON THIS PAGE
  • Step 1: Install and Activate Loco Translate
  • Step 2: Access Loco Translate
  • Step 3: Select the Plugin to Translate
  • Step 4: Choose a Language
  • Step 5: Start Translate deposit plugin Strings
  • Step 6: Save Your Translation
  • Test the Translations
  • Additional Tips
  • Troubleshooting

Need Help?

support@codeixer.com

Useful Links
  • Terms & Conditions
  • Refund Policy
  • Privacy Statement
  • License Terms
  • Password Reset Link
  • Affiliates FAQ
  • Affiliate Account
  • Become an Affiliate
  • Write for Us
2018 – 2025 Codeixer LLC. All rights reserved.